.png?height=120&name=MicrosoftTeams-image%20(6).png)
Everything you need to start with the Economic and Administrative Management of Additio App: account creation, general operation, preferences, multi-center, and data synchronization.
Index
- Creation of administrator accounts and role assignment
- Homepage functionality and search tool
- General account preferences
- Multi-center configuration
- Synchronization of students, base groups, and guardians
Creation of administrator accounts and role assignment
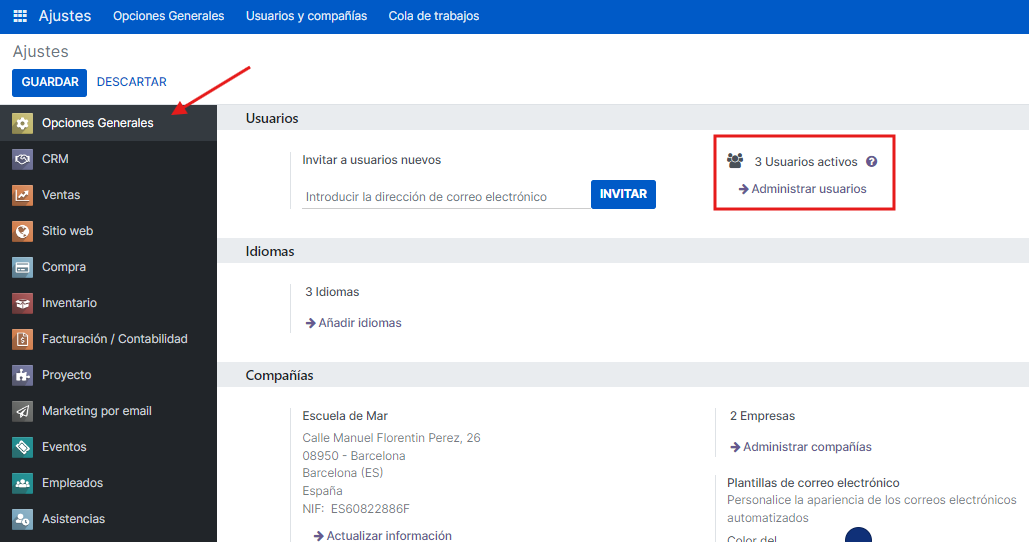
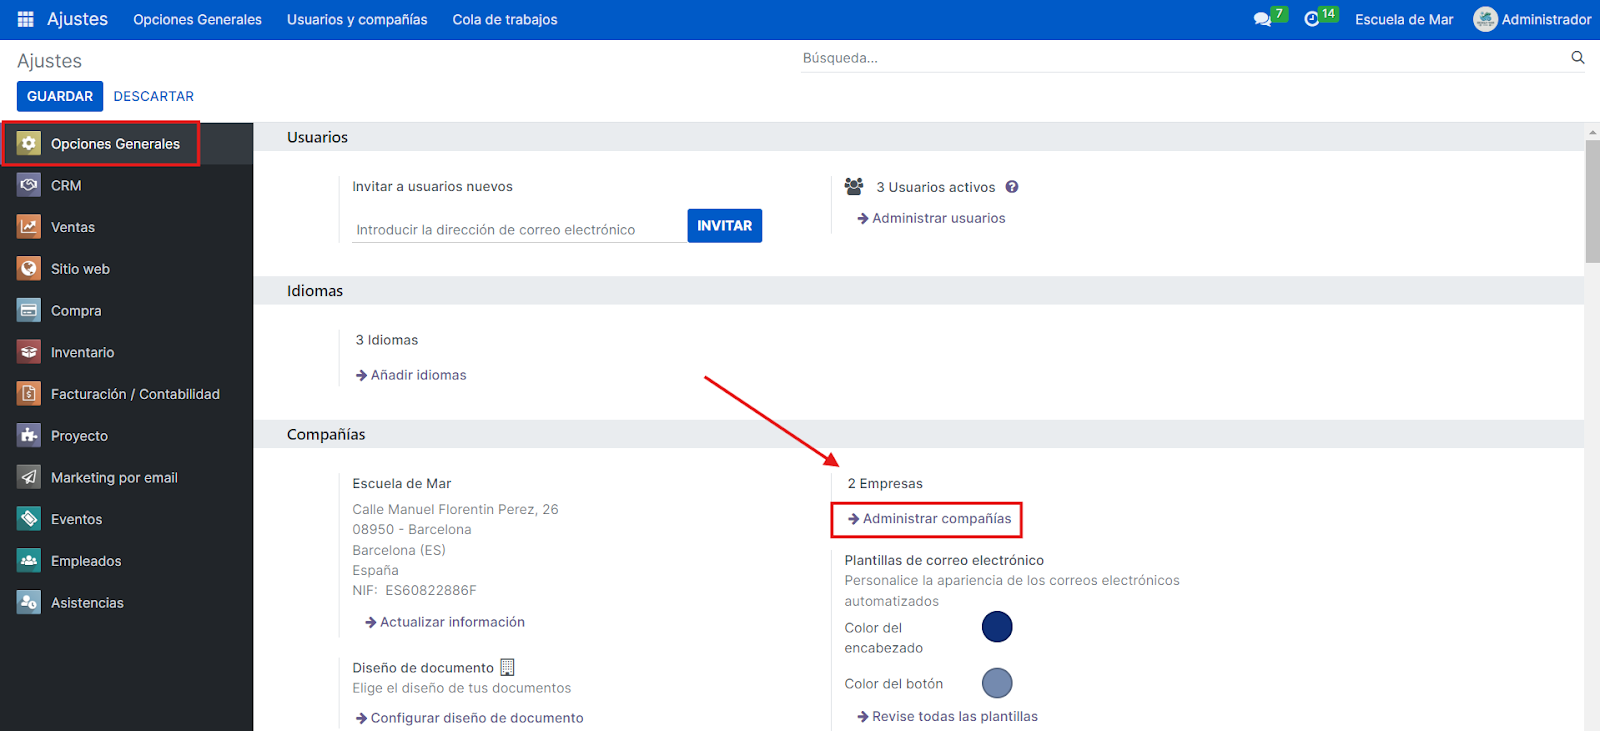
In the Economic and Administrative Management portal, select the Settings module to access the General Options.
In the General Options section, there is a Users section where you can find a people icon indicating Active Users. Click on the Manage Users arrow to create more user accounts.
Here, all users who have confirmed access are displayed. Press the blue +NEW button to create more users.

In the user creation form, you can configure personal information, access permissions, preferences, and it also allows the integration and synchronization of the Google Calendar with the system.

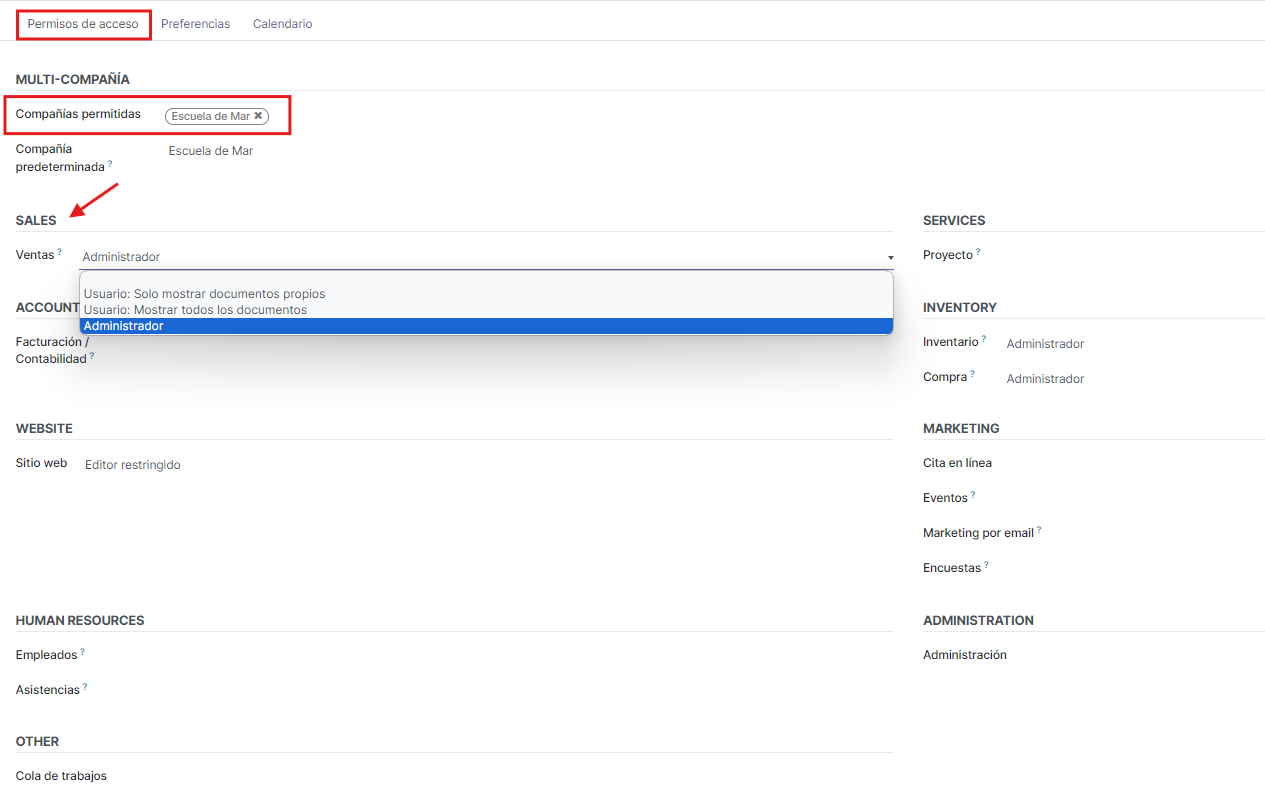
In the Access Permissions, you can select the allowed company (in case of MULTI-COMPANY) and assign roles in different company modules. For example, you can specify that a salesperson only has access as an Administrator in the SALES and INVENTORY modules.
In Preferences, you can customize the language, time zone, and notification options, set up the signature that will automatically be added to the end of sent emails, and view the user's karma level.

In the Calendar section, integration and synchronization with GOOGLE CALENDAR is allowed, which is essential for keeping the user updated with their events and tasks.

Once you have configured all the information, click on the cloud symbol located in the upper left to save.
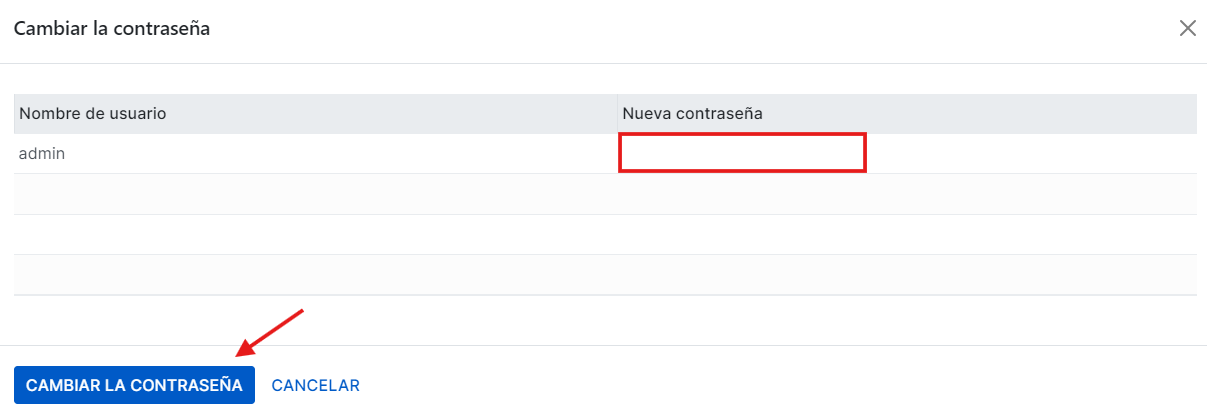
To generate the login with the password, in the upper right of the interface, there is an Action option. Click to enter and select the Change Password option.

In the Change Password window, you can create a new password. Finally, click on the blue CHANGE PASSWORD button to complete the action.
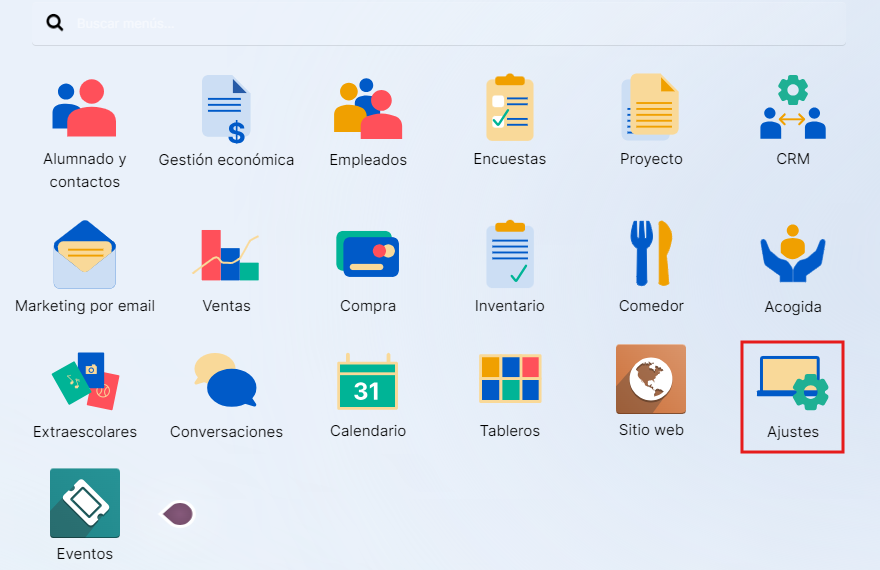
Homepage functionality and search tool
At the top of the Economic and Administrative Management portal, you will find a search bar that is very useful when you need to quickly locate specific modules, menus, or sections. For example, Mandates, the search bar helps you quickly find this option in the system.
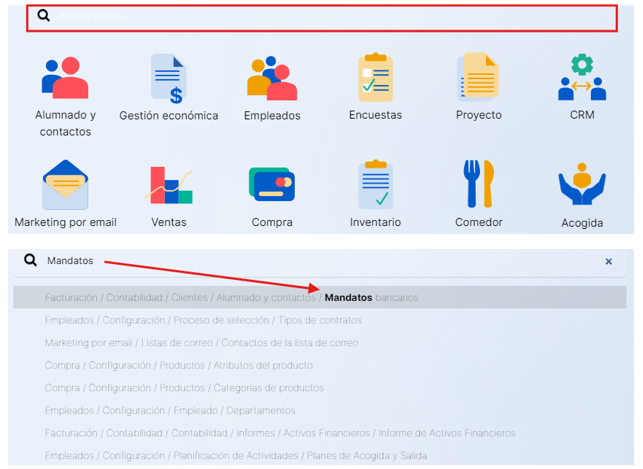
Additionally, you can find several modules, each with its different functions. Below is a brief description of some of them:

- Students and Contacts: Manage the information of students, guardians, and related contacts. You can also enroll students with concepts in bulk in this module.
- Economic Management: Includes the sections of Income Management, Expense Management, and School Accounting. You can invoice with receipts and orders, manage corrective invoices, unpaid invoices, returns, and generate remittances, among other operations.
- Employees: Manage employee data, including their department and job position. You can also record entries and exits, control schedules, and manage their attendance.
- Surveys: Create and manage surveys to collect information. For example, a survey form for "Enrollment Confirmation 2024-2025."
- Project: Monitor and manage projects and associated tasks.
- CRM: Manage customer relationships. In this module, you can create opportunities, quotes, activities, and follow up on subsequent situations.
- Email Marketing: In this module, you can create, manage, and analyze email campaigns. Manage contact lists and send emails.
- Sales: Manage orders and quotes. Invoice orders, create products with their variants and rates, and view the sales analysis report.
- Purchase: Make budget requests, manage purchase orders, and suppliers.
- Inventory: Perform inventory operations (Replenishment, Inventory Adjustments, Transfers, and Disposals) and control product stocks.
- Canteen: Manage cafeteria operations and services.
- Daycare: Manage daycare and childcare services.
- Extracurricular: Manage extracurricular activities.
- Discuss: Facilitate internal communication through messages and meetings.
- Calendar: Organize and view events and appointments in a general calendar. Allows synchronization with Google Calendar and Outlook.
- Dashboards: Create and view control panels with relevant information.
- Website: Customize the design of your website. Manage and update the school's website content.
- Settings: Configure and customize system options.
- Events: Manage the creation and management of organized events. Publish events on the website.
At the top right of each module, there is a search bar that helps you search more efficiently. Below, you also have the option to apply filters and group. Additionally, you can view in different formats.
For example, in the Students module. The filters option allows you to filter with different criteria, such as individuals, companies, customer invoices, supplier invoices, archived, active contracts, and custom filters.

The group option allows you to organize data by contact type, base group, salesperson, company, country, or create a custom group.

The Favorites option allows you to save the current search, import records, and add to your dashboard.

On the right side, you can find symbols representing different views. For example, the List view displays student data in a table format, making it easier to view and manage information.

The Kanban view displays student photos in a card format, providing a clearer visualization.

The Activity view shows the scheduled activities for each student. You can plan a new activity by clicking on Plan Activity.

General account preferences
At the top right of the portal, click on the user to enter the My Profile section.

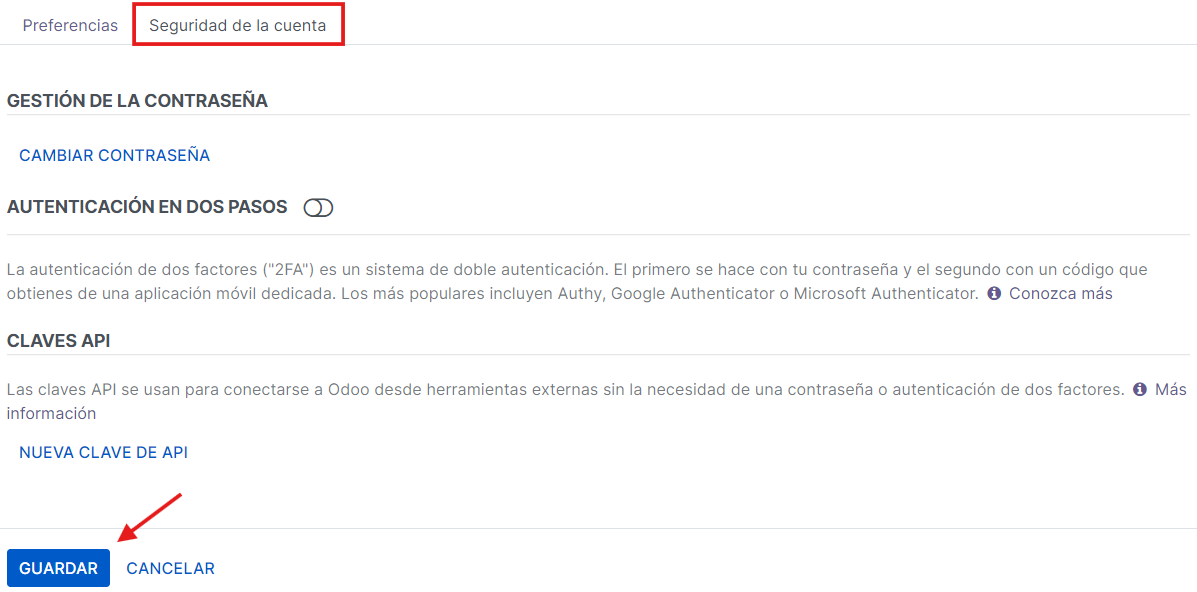
The Change My Preferences section allows users to customize their account settings. This area is divided into two sections: Preferences and Account Security.

In the Preferences section, you can customize notification options, language, time zone, email, and set up the signature that will automatically be added to the end of sent emails.

The Account Security section allows users to CHANGE PASSWORD and enhance their account protection through TWO-STEP AUTHENTICATION. API KEYS enable the connection to Odoo from external tools without needing to use a password or two-step authentication. After making changes, click the blue SAVE button to apply and save the changes.
Multi-center configuration
In the Economic and Administrative Management portal, select the Settings module to access the General Options.

In the General Options section, there is a Companies section where you can find the Businesses area on the right. Click on the Manage Companies arrow to create multi-companies.
A list of existing companies is displayed here. You can create a new company by clicking the blue +NEW button.

In the multi-company configuration form, you can enter and manage the basic and fiscal information of a new company, such as the company name and logo.
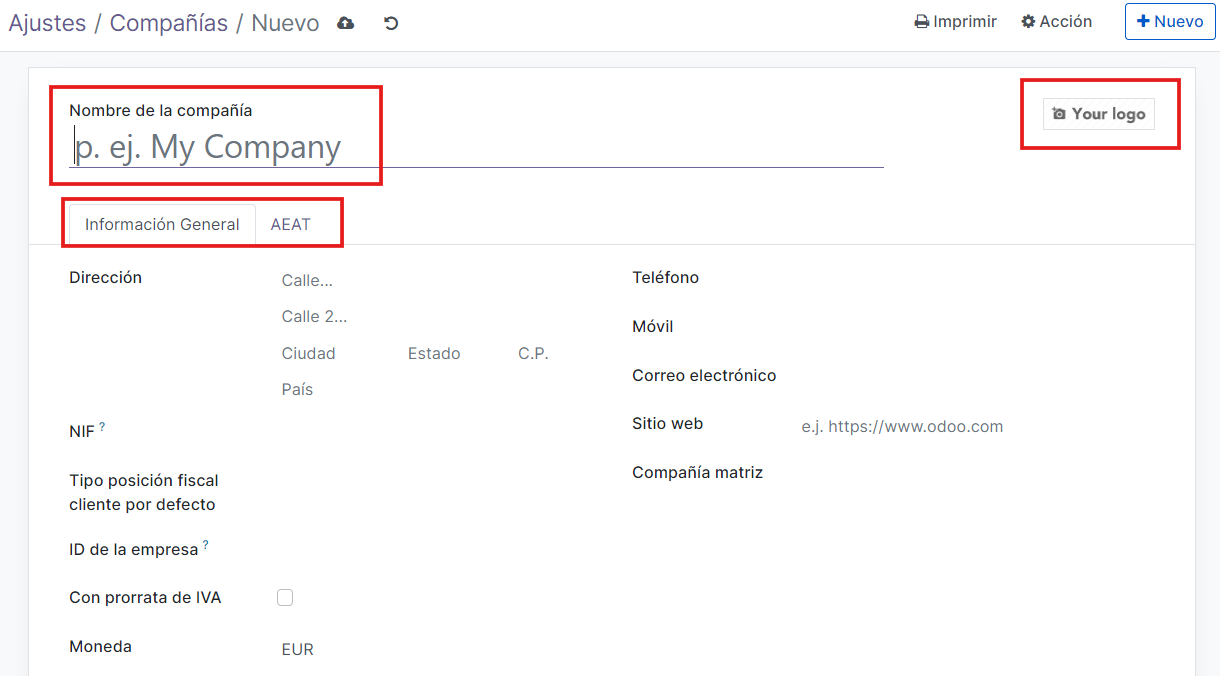
In the General Information section, you can enter the company's main address, the VAT number, select the fiscal position type (B2C or B2B), provide a company ID, indicate if VAT prorate applies to its fiscal operations, and specify the currency in which it will operate, among other essential company details.

In the AEAT section, you can select the corresponding Tax Agency for your company.

Once the configuration is complete, click on the cloud symbol located in the upper left to save the changes.
Synchronization of students, base groups, and guardians
If you have purchased to Additio Centers, Additio App allows you to synchronize all student data, base groups, and guardians in the Economic and Administrative Management section. For more information, you can consult your advisor.