.png?height=120&name=MicrosoftTeams-image%20(6).png)
After synchronization with Additio center, the records will be automatically created in Economic and Administrative Management. You will only need to enroll the corresponding concepts and add bank accounts, mandates, and divisions.
Index
How to add concepts to students
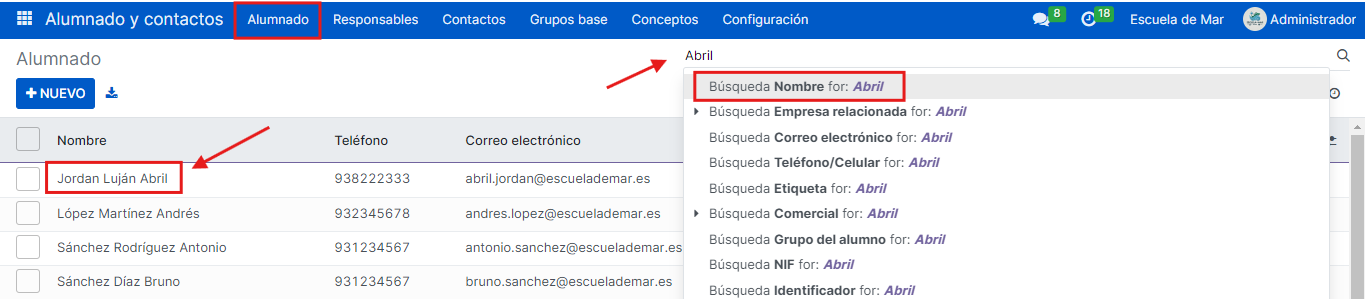
In the Economic and Administrative Management portal, select the Students and Contacts module to access it.

To add concepts to students, you can do it manually or in bulk, depending on your needs. Here is how to do it:
- Manually:
First, select the Students section in the top menu. Next, search for the student to whom you want to add the concept using the name search bar or select them directly from the list.
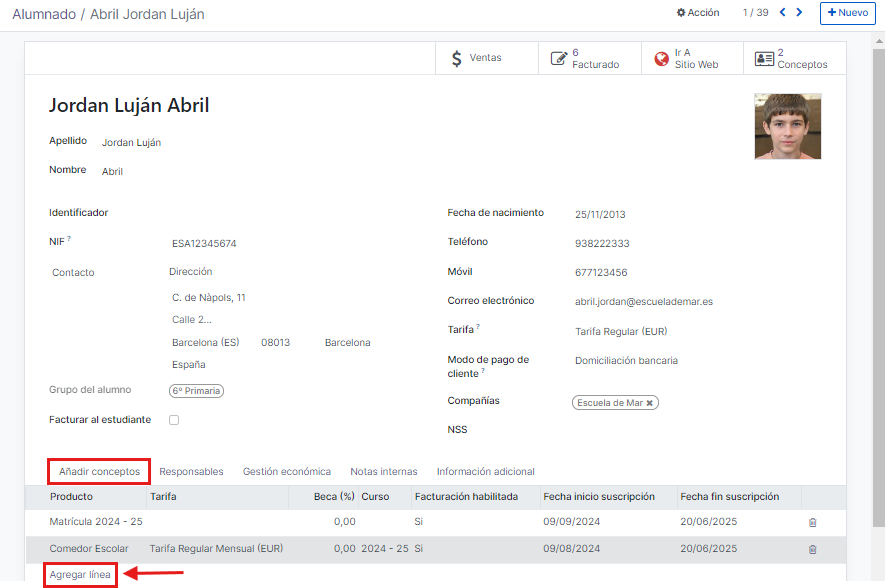
Below the student's record, in the Add Concepts section, you can select Add Line to include their concepts.
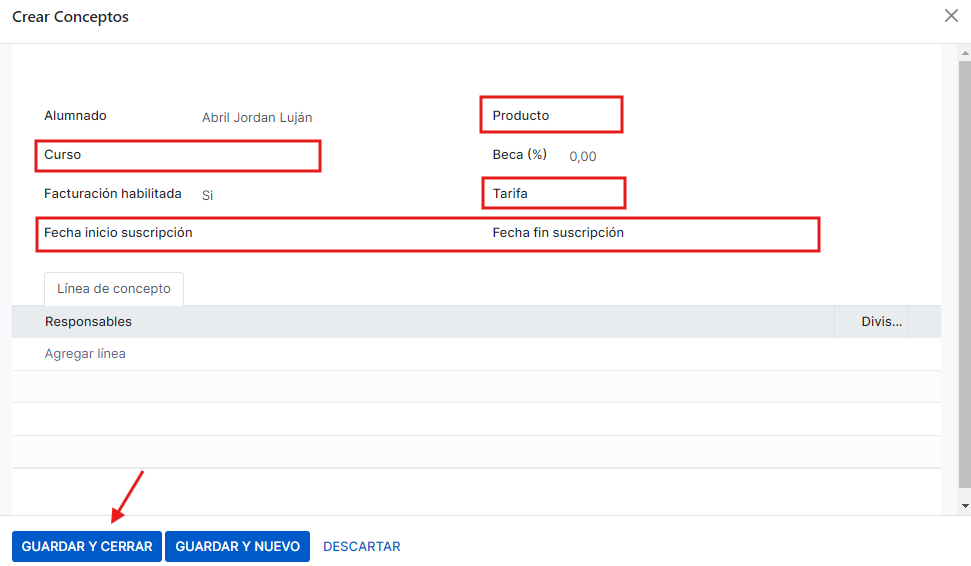
A Create Concepts form will now be displayed, where you can select the course, product, and corresponding rate for the chosen student from the dropdown menu, using configured or created options. You can also set the scholarship percentage, enable billing, and define the start and end dates of the subscription. Once all the necessary fields are completed, you can save the information by selecting SAVE & CLOSE or SAVE & NEW to continue adding more concepts.
-
In bulk:
Go back to the Students section, where you can search for students by their base group or select the block to mark all students.

After selecting the students, a gear icon will appear at the top as Action. Click on it and select Enroll Students to proceed with assigning concepts to the selected students.

A form will then appear where you need to select the Courses and Concepts you wish to enroll using the dropdown menu. You can enable or disable the option to use the default rates from the students' records. In the Students section, you will see the selected students and can Add Lines to include other students as needed. Finally, click on the blue CONFIGURE CONCEPTS button.

Once in CONFIGURE CONCEPTS, a form will appear to confirm the details, including the subscription dates and the billing enablement. If everything is correct, press the blue ADD CONCEPTS button to finalize the enrollment process.

Configuration of guardians
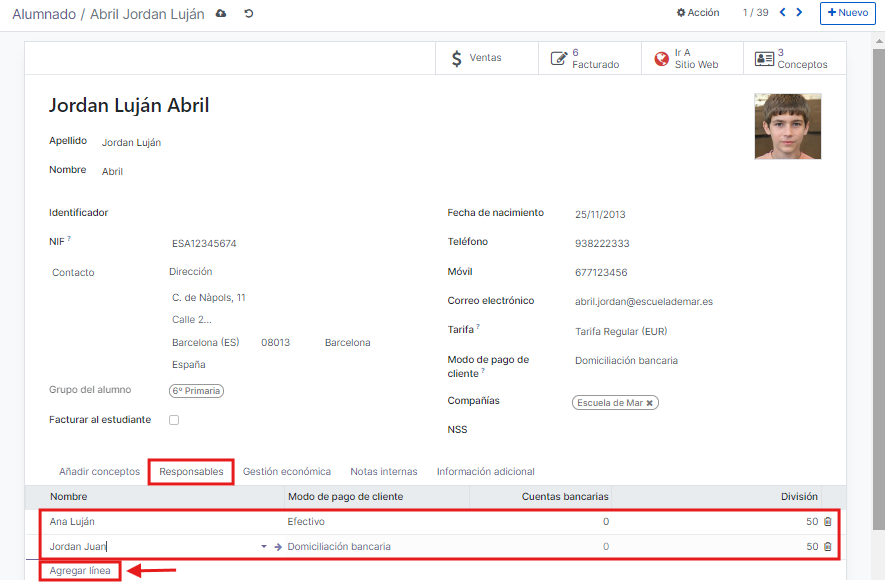
Go back to the main menu of the Students and Contacts module and select the Students section. Then, choose a student record, for example, Jordan Luján Abril.

Below the student’s record, you will find a Guardians section, where you can add the guardians. Click on Add Line to add a guardian. When clicking on the Name field, a dropdown menu with the list of already created guardians will appear. Once selected, their payment method will automatically be filled in. You can also set the percentages of the division linked to the student. The system allows linking more than one guardian.
It is important to ensure that the sum of the divisions among guardians equals 100. This can be done by assigning 100 to a single guardian and 0 to another, or distributing it as appropriate.
Once completed, press the cloud symbol located in the upper left to save the information.

Next, we will add the guardian's bank account. In the Guardians section, click on the guardian's name. You will see an arrow that will take you to the internal link of their guardian record.

Below their guardian record, select the Economic Management section, where you can add a bank account if you wish to set up direct debit payments. (If the payment is in cash, it is not necessary to complete this section). If the payment is made through a bank, ensure that the guardians involved in the payment (those with a percentage other than 0) have a bank account configured.

Additionally, in the Students section, you can also review the student who has been linked with their divisions.

Once completed, press the cloud symbol located in the upper left to save the information.

To process the payment correctly, it is necessary to add the direct debit mandate. (A bank mandate is an authorization that a customer gives to a company to debit their account on a recurring basis, usually for the payment of services or products).
At the bottom of the Economic Management section, click on the button labeled Mandate(s). Note that to add mandates, the Accounting / Payments permission must be activated.

Press the blue +NEW button to add it.

In the form, enter the mandate number, the bank account associated with the mandate, and the date the mandate was signed. Upload the scanned file of the signed mandate by clicking on the blue UPLOAD YOUR FILE button. Once all the information is complete and correct, click on the blue VALIDATE button to save and validate the mandate.
